This guide will cover the basics of installing new firmware on a Flip32 flight controller from ReadyToFlyQuads. In this guide I assume you have the proper drivers installed for your flight controller and know which COM port is assigned.
Before you begin any steps of this process, make sure your ESC’s & Flight Battery are disconnected from the Flight Control Board!
Step 1: Enable Bootloader
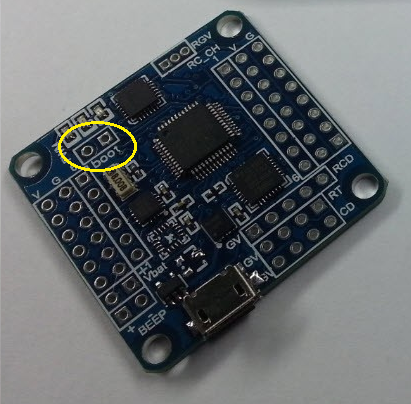
Under normal circumstances your 32bit flight controller will not let you upload new firmware. You must force the controllers boot loader to accept new firmware. There are two ways you can do this; through PC software or jumping the “BOOT” pins on the board itself.
Software Method (Requires Hercules Setup Utility)
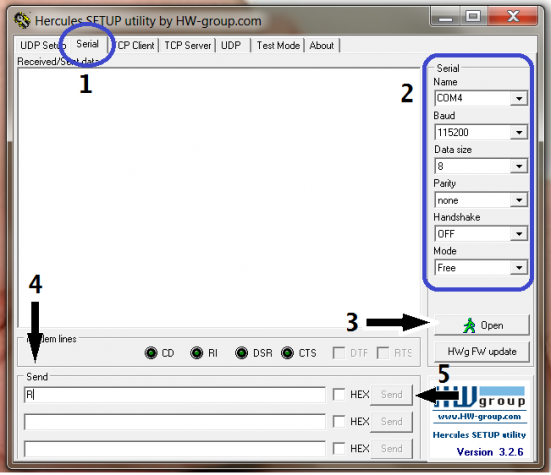
1. Click the Serial tab
2. Select the correct COM port. Make sure the Baud is set to 115200
3. Click Open
4. Use the first line in the Send box, and enter R (note: Harakiri 2.4+ requires three R’s, i.e. RRR)
5. Click on Send
If performed correctly, you will notice all three LED’s on the flight controller have gone solid. Your flight controller is now in Bootloader mode, and you can skip to Step 2. If all three LED’s did not light up, you might have done something wrong. Try again, or try the next method which should always work.
Hardware Method (requires full access to flight controller & a jumper pin)
1. Locate the two BOOT pins on the flight control board.
2.Short the two pins using a small section of bent paperclip or a jumper of some sort.
3. Plug USB into flight controller and apply power.
With the jumper installed, and board powered up, you should only see 1 blue LED. You can remove the jumper and proceed to Step 2.
Step 2: Upload Firmware
To upload firmware you will need the STM32 Flash Loader Software for your computer. I suggest downloading this version here, which is an older version of the software verified to work with our flight control boards.
You will also need a .hex file which is the actual firmware code.
Install and run the STM Flash Loader.
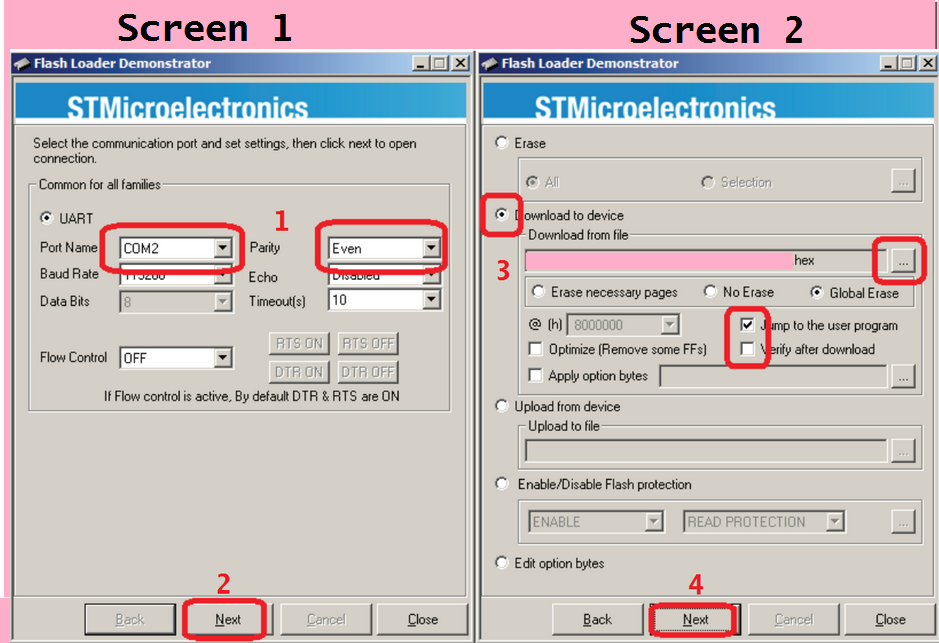
1. Select the correct COM port. And make sure Parity is set to Even.
2. click Next to connect to the board. Continue clicking the Next button until you reach Screen 2 shown above.
3. click Download to device then select the location for the .hex file you wish to upload. Copy the screen settings as shown above.
4. click Next to start the flashing process. Once complete, the flight controller should reboot itself and LED’s will blink as normal.
Congratulations you have now installed new firmware on your 32bit flight control board!


